Total Pageviews

Sunday, December 29, 2013

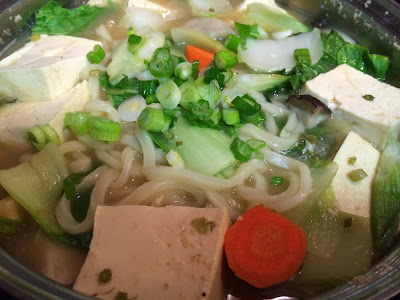
Super Simple Miso Hotpot with Home Made Chicken Meatballs


This is a hotpot that I make quite often as it's quick to prep and everyone in my family (including the kids) love it. The soup base is very simple to make and the rest is really up to your liking.  If you have some extra time, you can try making some home made meatballs.  Too much work? Just throw in some frozen gyoza and Vietnamese meatballs and your family will be just as happy.

There are a few staple veggies that will make this hotpot yummy but asides from that, find what's about to spoil in your fridge and dump it in!


Soup Base:

2 cups low sodium or regular chicken broth (sub with beef or veggie broth)
2 cups water
3 tablespoons miso paste
2 shiitake mushrooms (thinly sliced)
1 stalk green onion (minced)


Meatballs:

1 pound ground chicken or ground pork (see below for substitutions)
1 stalk green onion
1 tablespoon soy sauce
2 tablespoons corn starch
1 tablespoon ginger (finely minced)


Veggies & Stuff (optional-just suggestions):

Frozen gyoza/dumplings 
Vietnamese meatballs 
Carrots
Green veggies like Chinese Baby Bok Choy or Nappa, Hakusai
Tokyo Negi (large version of green onion)
Daikon (Japanese white radish)
Variety of mushrooms (King oyster mushrooms, enoki, shimeji)
Frozen Udon (2 bricks feeds our family of 4)
Korean rice cakes (Tteok)
Tofu 
Deep fried tofu puffs


How To - Meatballs:

1. Throw all the meatball ingredients together and mix/knead the meat with your hands until it is tender and mixed in well. The meat should feel tenderized and more fluffy to the touch.  This recipe will make approximately 20 meatballs. Voila, meatballs done!

Note: Ground chicken makes for a fluffier light meatball. If you wish for a more hearty texture, substitute with 1 pound of ground pork OR 1/2 pound chicken and 1/2 pound ground pork mixture.  I like the latter.


How To - Soup Base:


1. Add water and chicken stock in a large wide pot.
2. Throw in shiitake mushrooms and green onions.
3. Cover pot and bring to a boil on high heat.
4. Once the pot has boiled, add 3 tablespoons of miso paste.  Put the miso paste in a soup ladle and stir to dissolve with a chopstick. This  is a better way than just dumping it straight into the pot as miso tends to clump and takes time to dissolve and so someone might get a clumpy surprise.   Soup is ready!

Note: If you are using regular chicken broth rather than low sodium, decrease the amount of miso paste from 3 tablespoons to 2 tablespoons. If the soup tastes too bland, add more to your liking.


How To - Adding Everything Else:

How to roll meatballs

1. Shape the meatballs by taking two spoons and rolling the meat together. Drop directly into the boiling pot.  If you are adding frozen dumplings or Vietnamese meatballs, add them to the pot now and cook as per package instruction cooking time.


2.  Add the harder to cook veggies like daikon and carrots.  
3. Cover pot and bring back to a boil.
4. Once it's back to a boil, lower the heat to medium-high and add the softer veggies like the greens, tofu, and mushrooms. 

Note: You can add the udon noodles now but I tend to leave it for the second round as my kids will not eat the rest of the stuff (especially the veggies) if they get their hands on the udon. If you are going for a second round and the soup has depleted, you can top it up by adding more water and miso paste to your liking.

**Cold Defense Ingredients**
Ginger is said to have cold defense properties as well as warming up your body. Therefore, during the cold winter months when the flu season has begun, I add a tablespoon of minced ginger to the soup base to give it an extra kick.

Enjoy!


Sunday, March 17, 2013

5 Minute Tuna & Veggie Mixed Rice (Fried Rice Japanese Style)


This recipe is so quick and easy. Your rice cooker does all the work for you!

I make this recipe when I'm tight on time and needing one extra dish at the dinner table. I made this today with the chicken wings (see previous post).  It's also tasty if you pour some of the sauce from the wings on the rice too.

I also make this alot when my kids go through the picky eating phase. I dice up tons of veggies and sneak them in!

If I have leftovers, I throw it in a ziplock bag and freeze it (tastes good reheated too) or I make them into rice balls (onigiri) for lunch.


Rice (uncooked) 2 Cups
Tuna 1 Can (regular size not mini)
*Soy Sauce 2 Tablespoons
*Cooking Sake 2 Tablespoons
*Chicken stock powder 1 Teaspoon
Carrots 1/2 or to your liking
Peas or Edamame 1 Handful or to your liking
Shiitake Mushrooms (optional) 3-4 or to your liking

How to:

  1. Dice up the carrot and shiitake mushrooms into bite size pieces and set aside.
  2. Wash 2 cups of rice in the rice cooker pot as you normally would when preparing to cook rice. Drain out the water.
  3. Add the ingredients in asterisks (*) in the rice cooker pot BEFORE adding water.
  4. Fill the rice cooker pot with water to the 2 cup line.  If measuring water in a cup, add a tad bit less than you normally would(each machine varies).
  5. Throw in the carrots, peas/edamame and shiitake mushrooms.
  6. Break apart the tuna chunk into pieces and also add to the pot.
  7. Cook rice as per your regular settings.
  8. When the rice is cooked, let sit for 10 minutes and serve.

Helpful tips:

You can probably substitute canned salmon for tuna but I have never tried it.
You do not need to stick to the veggies that I've listed above. Spinach is yummy too. Feel free to throw in whatever veggies are lying around in your fridge.


Special Mention/Credits:
This recipe was posted on cookpad.com by maca-san. This recipe is not my own. I am simply translating it to share with all of you. The original recipe along with photos can be found here http://cookpad.com/recipe/1818651.


Disclaimer:
The original content was taken from a Japanese website cookpad.com. The original recipe was posted by a user on the site. It is not my own. I am simply translating the recipe in English to share with my friends. I am not responsible for the content, outcome or anything else for that matter!  But if your family ends up lovin' it you can treat me to coffee hehe!
I am not responsible for the actions, content, accuracy, opinions expressed, privacy policies, products or services or for any damages or losses, directly or indirectly, caused or alleged to have been caused as a result of your use or reliance on such information.

This Website/Blog includes links to other sites operated by third parties. These links are provided as a convenience to you and as an additional avenue of access to the information contained therein. I have not reviewed all of the information on other sites and are not responsible for the content of any other sites or any products or services that may be offered through other sites. The inclusion of these links in no way indicates their endorsement, support or approval of the contents of this site or the policies or positions.


Wednesday, March 6, 2013

4 Step Japanese Chicken Wing Recipe (10 min prep)

This yummy recipe is so simple to make that you'll find it on my dinner table quite often. My entire family loves this dish and even my one year old can enjoy it as there isn't any milk or eggs in this recipe.


These wings can be served up as a meal alongside miso soup and  salad or it can also go very well as a sidekick to your Asahi...ahhhh!


Ingredients:


Chicken wingettes 12 pieces
Fresh shiitake mushroom (optional) 3
Green onion 1 sprig/bunch
Minced ginger (fresh or jar) 1 stem (size of thumb) or 1 1/2 teaspoons (jar)
Minced garlic (fresh or jar) 2 cloves or 1 1/2 teaspoons (jar)
* Soy sauce & Rice vinegar 3 tablespoons EACH
* Sugar 1 1/2 tablespoons
* Cooking Sake 1 tablespoon
Corn starch (optional) 1 tablespoon

How to:

Brown the chicken wingettes in a non-stick frying pan until the skin is golden in color but NOT cooked all the way through. If you are using an aluminum frying pan, heat a bit of olive oil and then add the chicken so it does not stick to the bottom of the pan.


Transfer the wings into a pot large enough so that they can lay flat.  Add just enough water to submerge the chicken (not too much or the sauce will become watery). 
Heat on high until it comes to a boil and then reduce heat to medium.


Add minced garlic, minced ginger and all the ingredients with asterisks * into the pot.
Thinly slice green onions and shiitake mushrooms (optional) and throw into the pot.
Continue to boil on medium heat for 20-30 minutes (until most of the water is evaporated). 


In a small bowl, add a tiny bit of hot water to 1 tablespoon of cornstarch and mix until cornstarch is melted. Add it to the pot and increase the heat to high and cook until most of the sauce has evaporated and thickens. (Stay close to the stove as it will burn fast). 

Transfer to a plate and enjoy!


Helpful Tips:

If I have leftovers, I take the meat off the bone and freeze it with the leftover sauce.  It's yummy to put in ramen noodles. I also use it for onigiri. I mix it into the rice or I put it in the center of the onigiri kinda like a kinder surprise. The kids love it!


This is the brand of jarred minced ginger and minced garlic that I buy but any brand will do.
I pick this up at T&T.


Special Mention/Credits:
This recipe was featured in a Japanese cookbook called Favorite 100yen Meals. 

Disclaimer:
The original content was taken from a Japanese cookbook. It is not my own. I am simply translating the recipe in English to share with my friends. I am not responsible for the content, outcome or anything else for that matter!  But if your family ends up lovin' it you can treat me to coffee hehe!
I am not responsible for the actions, content, accuracy, opinions expressed, privacy policies, products or services or for any damages or losses, directly or indirectly, caused or alleged to have been caused as a result of your use or reliance on such information.

This Website/Blog includes links to other sites operated by third parties. These links are provided as a convenience to you and as an additional avenue of access to the information contained therein. I have not reviewed all of the information on other sites and are not responsible for the content of any other sites or any products or services that may be offered through other sites. The inclusion of these links in no way indicates their endorsement, support or approval of the contents of this site or the policies or positions.

Thursday, February 21, 2013

Lazy Mama's Udon Spam Veggie Soup (10 minute Recipe)

I ran out of noodles this day so I used rotini. 
You're up at the crack of dawn, likely woken up by your screaming kids who are charged up  and excited to get the day rolling! You've barely had time to brush your teeth & wash your face but the kids are moaning that they're hungry.

 I came up with this quick recipe on such a beautiful day like this a few months back.

I know this isn't the most healthiest of recipes (note spam) but I wanted to ensure that they had a helping of veggies, protein and carbs to energize their day. I also didn't want to spend too much time in front of the stove as I have a crazy toddler to watch who climbs, flushes and chews on everything in sight.

As always, please tell me how you make out with this recipe & your suggestions and feedback is very much appreciated.  A photo for me to share of your rendition to this recipe would also be fantastic!


Ingredients(for4):


Frozen udon noodles OR macaroni 1 block (udon) OR 1/2 cup (macaroni)
Spam 2 slices
Udon soup mix (powder) 1 pouch
Frozen mixed veggies 1/2 cup or roughly 2 handfuls
Water 4 cups
Onions (optional) 1/4 (small)


How to:

1. In a medium saucepan, bring water to a boil

2. Add udon noodles (or macaroni) and boil according to the package instructions.

3. Slice the block of spam and set aside two pieces. Lay the remainder on a cookie sheet, cover with saran wrap and freeze for future use. (When they're frozen, transfer them to a ziploc bag and store in the freezer).


4.  Cut the two slices of spam into bite size cubes and grill on a frypan until they are lightly brown in color.  (I don't use any oil as the spam is oily enough).


5.  Add the mixed veggies and onions (optional) to the pot and once the water comes back to a boil, add the udon soup mix. 


You can purchase udon soup mix at most Asian Supermarkets and online.
T&T carries a smaller box of 8 but I purchased mine at Fujiya as they come
in a 20 pack box for cheaper.
6.  Stir well until the udon soup mix has dissolved.
7.  Lastly, throw in the grilled spam & serve.
8.  Add additional salt and pepper to your liking. I don't add any as the spam adds to the saltiness.

Helpful tips:

  • I add double the water than what the udon soup mix instructions require (package instructions are based on adult portions). I do so as I dont' want it to be too salty for the kids and the spam also already adds salt to the soup.
  • On those days when I have a bit more energy & time, I will add fresh vegetables that I find in my fridge.  Green onions, broccoli, mushrooms, clove of garlic even daikon goes well. I tried cabbage and it's fine but once it cools down it smells like fart!
  • You do not need to grill/brown the spam but I find that it brings out the flavor and adds richness to the soup. This extra step does make a difference!
  • I also add a helping of frozen edamame as my kids love it.
  • If you prefer to substitute the spam for a healthier option, you can add chicken  or sausage.  I would grill/heat them first before adding to the pot. Make sure that the chicken is fully cooked before adding to the soup. Bacon and ham go well with this soup too.
レシピ検索No.1 料理レシピ載せるなら クックパッド

Disclaimer:
I am not responsible for the actions, content, accuracy, opinions expressed, privacy policies, products or services or for any damages or losses, directly or indirectly, caused or alleged to have been caused as a result of your use or reliance on such information.

This Website/Blog includes links to other sites operated by third parties. These links are provided as a convenience to you and as an additional avenue of access to the information contained therein. I have not reviewed all of the information on other sites and are not responsible for the content of any other sites or any products or services that may be offered through other sites. The inclusion of these links in no way indicates their endorsement, support or approval of the contents of this site or the policies or positions.

Tuesday, February 19, 2013

Kabocha & Chicken in Tomato Cream Sauce (20 min recipe)

Kabocha (Japanese pumpkin) is a favorite amongst the Japanese as it is very rich in nutrients such as beta carotene, vitamin C, iron and potassium.


Although we try to incorporate it into our daily meals, we often struggle with keeping it exciting!

I found an interesting recipe that puts a spin on traditional steamed kabocha recipes.  I have yet to try this recipe out myself so I apologize as I do not have any photos.  I'm posting this recipe for my friend so I hope she will make it for us and share with us her photos! She is much more talented in cooking and photography (my food photos are a disaster)  so I look forward to hearing from her.

I would also love to hear your feedback and see photos of your rendition of this recipe.


Ingredients (for 2):
Boneless, skin-on chicken thighs 1 piece (600g)
Kabocha (seeds removed) 1/4 (400g)
Onion 1 small or 1/2 medium
Garlic 1 clove
Butter or EVO 1 teaspoon
Flour 2 tablespoons
* Diced tomatoes in a can 2 cans (14.5 oz each)
* Cooking Sake 50mL
* Water 1 cup
* Milk 1 cup
* Sugar 1 tablespoon
* Chicken stock powder 1 tablespoon
Salt & Pepper 1 pinch each
Cream or plain yogurt optional (for garnish)
Fresh or dried parsley optional (for garnish)


How to:

  1. Cut chicken thighs & kabocha into bite size pieces. *keep the skin on the kabocha.  
  2. Thinly slice garlic and onions and set aside.
  3. Heat butter or EVO in a non-stick frying pan and sauté the chicken thighs (skin side down) until they're lightly brown in color (does not have to be cooked through).
  4. Add onions, garlic and kabocha in with the chicken and lightly mix together.
  5. When the onions soften up and turns translucent in color, add the flour and stir together.
  6. Once the flour is mixed in well (can't see traces of white powder), add the ingredients in *asterisks *  and simmer on low heat (do not cover with lid).
  7. Simmer on low heat until the kabocha becomes tender (pierce with a fork or toothpick).
  8. You may notice the liquid evaporating while it simmers but do not add water.
  9. Take a taste and season with salt and pepper according to  your liking.
  10. You can lightly drizzle some cream or plain yoghurt to jazz it up & sprinkle some parsley.
Helpful tips:

For a healthier option, you can substitute the "skin-on" chicken thighs for skinless.
Be sure to brown the chicken thoroughly as the more you brown it, the rich in flavour it will be.

**As stated, I have not tried this recipe yet so please be mindful that the portion sizes might be different from our North American expectations. I find that Japanese dishes are usually smaller in size (I guess they eat less than we do).  


Special Mention/Credits:
This recipe was posted on cookpad.com by Ayu Kajiwara-san. You can find the original recipe along with photos here http://cookpad.com/recipe/1646801 .


Disclaimer:
The original content was taken from a Japanese website cookpad.com. The original recipe was posted by a user on the site. It is not my own. I am simply translating the recipe in English to share with my friends. I am not responsible for the content, outcome or anything else for that matter!  But if your family ends up lovin' it you can treat me to coffee hehe!
I am not responsible for the actions, content, accuracy, opinions expressed, privacy policies, products or services or for any damages or losses, directly or indirectly, caused or alleged to have been caused as a result of your use or reliance on such information.

This Website/Blog includes links to other sites operated by third parties. These links are provided as a convenience to you and as an additional avenue of access to the information contained therein. I have not reviewed all of the information on other sites and are not responsible for the content of any other sites or any products or services that may be offered through other sites. The inclusion of these links in no way indicates their endorsement, support or approval of the contents of this site or the policies or positions.

No Mess Onigiri (rice balls) for Tiny Hands

My kids are huge fans of onigiri (rice balls) and nori (seaweed).  Me...not so much! Why? Because it's a mess to clean up!  The rice crumbles everywhere and the aftermath is just a disaster.

Well I found a recipe on cookpad.com which was posted by NOAmama. It is a very creative way for serving up no-mess onigiri.  Even the littlest hands can help themselves without creating a disaster for mom to clean up!


Ingredients:

1 sheet of nori (seaweed) of your preference
1 scoop of cooked rice
*optional furikake (dried fish, seaweed mix flakes)

1 kitchen scissors

How to:


Spread "cooled down"rice on half side
of the nori & sprinkle rice flakes (optional).


Here's a pic of rice flakes.  You can
purchase them at most Asian Supermarkets. 
They're usually made of dried fish, shrimp & eggs so
I like to sprinkle some on for added nutrition.
You can also search on Amazon for "furikake".


Fold over the side that's not 
spread with rice and and lightly
squish down (kinda like a sandwich).


Take kitchen scissors and 
cut into bite size squares.
Voila!

A few points:

You may use hot rice but I prefer to use cooled down rice (not cold as in the fridge).  Serve immediately as the longer it sits, the nori will become soggy and chewy.


Thank you NOAmama-san for this disaster-free recipe!

You can view her actual recipe online at http://cookpad.com/recipe/1824593

Allergy alert: This particular furikake (rice flakes) does not contain any egg or milk products. Egg is a staple of most most furikake so please be sure to read the ingredients list carefully.
I bought this particular one at T&T in Metrotown (for you BC residents).

Disclaimer:
The original content was taken from a Japanese website cookpad.com. The original recipe was posted by user NOAmama. It is not my own. I am simply translating the recipe in English to share with my friends. I am not responsible for the content, outcome or anything else for that matter!  But if your kids end up lovin' it you can treat me to coffee hehe!
I am not responsible for the actions, content, accuracy, opinions expressed, privacy policies, products or services or for any damages or losses, directly or indirectly, caused or alleged to have been caused as a result of your use or reliance on such information.

This Website/Blog includes links to other sites operated by third parties. These links are provided as a convenience to you and as an additional avenue of access to the information contained therein. I have not reviewed all of the information on other sites and are not responsible for the content of any other sites or any products or services that may be offered through other sites. The inclusion of these links in no way indicates their endorsement, support or approval of the contents of this site or the policies or positions.


Monday, February 18, 2013

How I Got Started

Both of my kids have food allergies.  My daughter is allergic to peanuts, all tree nuts and most fish. My son is severely allergic to all milk products and eggs. Combined, it makes for quite the food challenge!

Although my children suffer from food allergies, I don't want them to fall victim to the allergens.  I want to show them that there are many food options & meals which they can enjoy and eat safely.  I also don't want my children to grow up becoming picky eaters and so I decided against becoming a short-order cook and am refraining from catering meals to each of them.  Therefore, my challenge to myself is to find recipes and cook dishes which the entire family can enjoy! 

So...easier said than done. Recipes with NO milk, eggs, nuts and fish...oh man!

Prior to my son and his food allergies, I cooked a mix of Western and Asian meals but nowadays I'm finding that my table is lined with Japanese food most nights.  Traditionally (prior to foreign influence), Japanese cuisine did not incorporate the use of dairy and so I've had much success in finding recipes that work for our family.

I was introduced to an amazing site called cookpad.com.  It is a Japanese site dedicated to  mostly Japanese recipes.  It's kinda like a Japanese version of allrecipes.com (but better IMO). You can contribute by posting your own recipes and you can also receive feedback along with a picture from users who have tried your recipes. It's a really neat site. It wouldn't be an exaggeration to say that I am on the site every day!

So as I was raving about the site to my friends, they had started to ask me for some recipes.  My friends being non-Japanese, I started translating some of my favorite recipes into English for them to try.  I hope you find enjoyment out of these recipes as well!

**Note: not all dishes posted on this blog are free of milk, dairy, eggs and fish. I am not a dietician or allergist. Please consult a professional. I cannot guarantee that the recipes posted are free of any and all allergens. I am simply translating recipes to share with friends. The original source content is not mine.